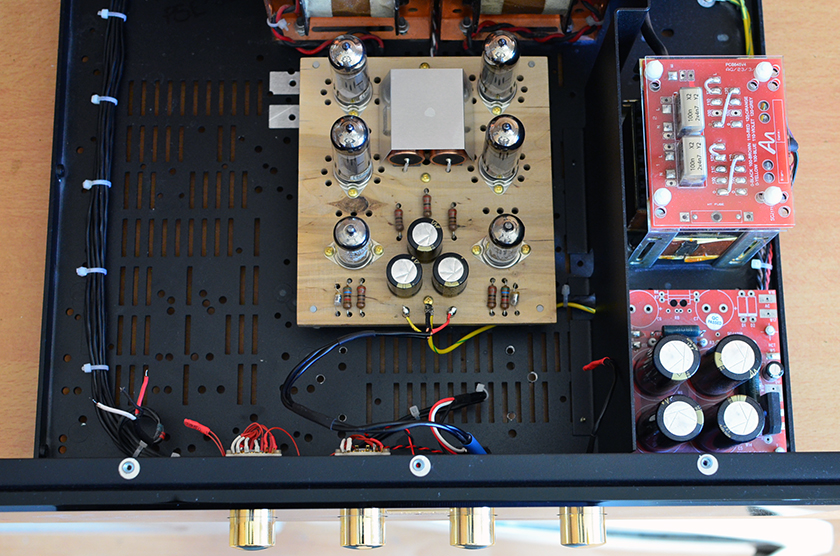
This project came as the logical end of a continuous process of refining the amplifier’s performance. The itch to find out how a stepped attenuator would perform against the ubiquitous volume potentiometer became increasingly acute after the surgery that transformed my Audio Note OTO Phono SE Signature integrated amplifier into a P1 SE Signature power amplifier.
The surgery consisted of getting rid of the line stage, phono stage, their respective power supplies, shunting the tape selector switch, and removing the balance pot. The improvement I heard after dealing with the clutter was remarkable. The power amplifier section, based on a pair of EL84 power pentodes in a parallel single-ended configuration driven by one SRPP-connected 12AX7 double triode per channel, turned out to be very sensitive and responsive to the line-level signal sourced from a CD player or TV. When directly driven from the volume pot, it showed no deficiencies — quite the opposite. Tone color, rhythm and pace, transparency, low-level nuances, and detail in the lower octaves improved tremendously and made me enjoy digital playback again.
I came to the realization that the only way to further improve the performance was not by adding another amplification stage, which would inevitably inject some distortion, but by concentrating on the attenuation quality upstream. So, I decided to take the plunge into the deep waters of signal attenuation.
As an introduction, I would say that a volume potentiometer is basically a potential divider that keeps the impedance seen by the source constant, independently of the volume setting. There are two ways to simulate such attenuation behavior with a switch and resistors — one is to connect as many resistors as attenuation steps in a chain (series), while the other is to connect as many pairs of resistors as attenuation steps in parallel (ladder). The advantage of the series resistor network is that there is only one switch contact (at the junction between two adjacent resistors in the chain), but at the same time it has as many solder joints as attenuation steps. The ladder type, in contrast, needs two switch contacts (at both ends of a resistor pair), but only one soldering point. A very good article with explanations and schematics can be found here.
However, some smart men came up with a third way that combines the strengths of the aforementioned two methods. Although it is not a precise equivalent of the potentiometer, since the impedance seen by the source varies, the so-called shunt type needs only one switch contact and one solder joint. The shunt type attenuator is a potential divider whose first resistor has a constant value (most often 100kΩ), whereas the second resistor, across which the voltage drop driving the amplifier develops, is switchable. I decided to go that way because of its simplicity and the fact that Audio Note employs the same type in their higher-level preamps.
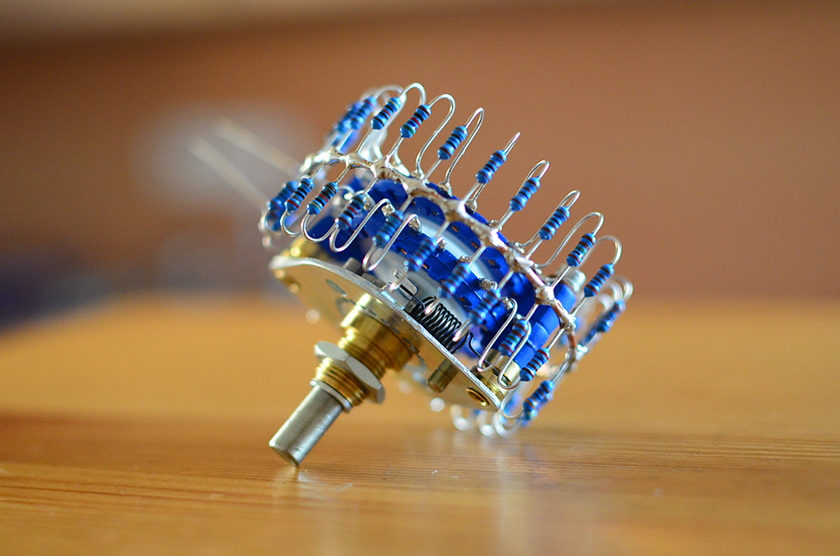
I decided not to cut corners on the mechanical part and went with a Blore Edwards 23-step stereo attenuator switch — the same unit Audio Note used in their now-obsolete 23-step attenuator. I chose generic metal-film 0.5-watt resistors with 1% tolerance that can be found at Reichelt (the German equivalent of Farnell, Mouser, etc.) and based their values on the 100kΩ 34-step shunt-type network table generously provided by Hificollective. Although my switch had only 23 positions, I preferred to use finer attenuation steps by skipping the first few and the last few resistors shown in the 34-step table, as I expected these to be at the extremes of the range I usually don’t use. In the end, all 66 resistors I ordered cost me less than a single Audio Note tantalum resistor with the same power rating. Funny.
I didn’t expect much, I have to say. I just wanted to check whether the chosen resistor values worked well and get a general feeling for it. I had no illusions that I could build something as beautifully crafted as Audio Note’s 36-step attenuator. This switch, developed in-house, is unique, with no parallel in the audio industry to my knowledge. Generally, all available attenuator switches use two mechanical contacts per wafer. You can see it in the image below — one contact is in constant contact with the wiper’s base, while the other is made between the wiper and a pin. Audio Note’s 36-step switch is the only one to enter the territory of the single-contact switch, where a wire running through the shaft is soldered directly to the wiper’s base. True, the wire will twist with rotation, a maximum of half a turn in each direction, but provided it has sufficient length, this will stress neither the solder joint nor the multi-strand wire itself. Multi-strand wires are designed to withstand twisting; we see them twisting in tonearm bases, and we see them everywhere.
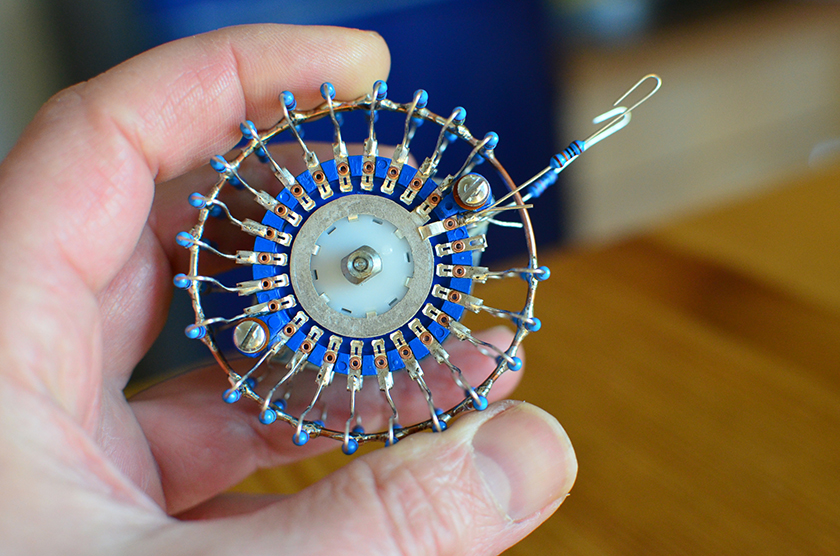
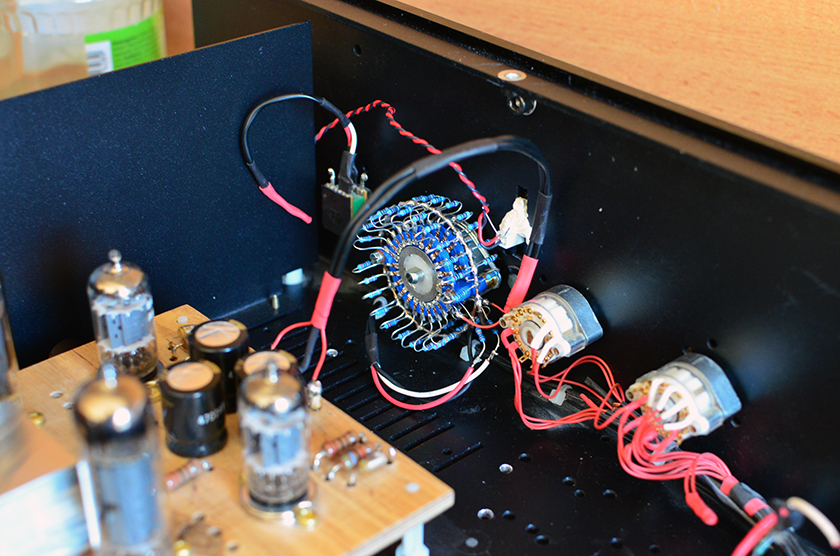
The assembly was pretty straightforward, and it took me 3–4 hours to complete. All the resistor pairs came in labeled bags, which made sorting a breeze. The switch was easy to disassemble, allowing each wafer to be worked on conveniently. First, I soldered all the resistors to each wafer in a star configuration, then I bent them and joined them together with a ring of thick solid copper wire. After completion, I checked all positions in both channels with a multimeter for correct resistance values, and everything was good. Installing the assembled attenuator in the OTO was a breeze because there was plenty of space inside the enclosure. I used the balance pot opening in the chassis to mount it.
Listening impressions
With the first tones, it became clear that some serious magic was going on. The vocals struck me first — three-dimensional and breathing. I could hear the atmosphere; there was transparency and a certain sweetness in the presentation that made me hold my breath and stay for a few minutes, almost hypnotized. It was Loyko’s Road of the Gypsies live recording, produced by WDR (Westdeutscher Rundfunk) as part of their World Network series. Seriously energetic music, with vibrant colors and great violin solos. At the same time, I had the feeling that the sound shimmered a bit; it was not as steady, but it conveyed a sense of fragility and sweetness. The tonal balance shifted slightly toward the brighter side, but there was a level of nuance and detail in the lower octaves that made the potentiometer sound bloated and midrange-oriented in comparison. The stepped attenuator also brought a noticeable expansion of the frequency extremes, especially in the top octaves, together with a more stable and three-dimensional soundstage.
Along with the improvement in sound, the stepped attenuator outperformed the pot in terms of usability as well. It turns out that the 100kΩ 34-step resistor table applied to a 23-step attenuator works like a charm, providing better logarithmic behavior than the pot. Before, I usually operated the volume knob between 9 and 9:30 o’clock to bring the softest and loudest-sounding records to the same level. This was a rather narrow range that made precise volume adjustment difficult. Now the same range spans between 9:30 and 12 o’clock. I have better control, and I have never felt the need to set the level between two steps. Sure, the pot has a nice smooth turning action, while the switch jumps from step to step, but that’s pretty much the only trade-off I can identify.
Further listening sessions confirmed that, even though it was made with generic metal-film resistors, the attenuator was a considerable improvement over the stock volume pot. I have to say that the performance of this system really started to amaze me. It is intoxicating, and I feel like an addict patiently waiting to take my daily dose of being in the presence of great performers. This machine really brings them to life, and I often have the feeling that I am summoning ghosts here.
Some music recommendations
Larry Coryell — Private Concert — CD / 1988 — Acoustic Music Records
Sonically a bliss: sonorous and full-bodied guitar tone, with excellent touch and feel. Very meditative.
Cassandra Wilson — She Who Weeps — CD / 1990 — Winter & Winter
Stefan Winter rarely disappoints: amazing production with gorgeous tone and feel.
John McLaughlin Trio — Live at the Royal Festival Hall, London — LP / 1990 — Winter & Winter
Great music and outstanding sound quality, among the best records I have come across.
Thank you for stopping by, and happy listening!
Hi,
Informative blog article, I have bought the same Blore switch could you tell me which resistors you missed out on the 34 step table?
Thanks
Hi Chris,
Thanks, I have skipped the first 6 steps from the 34-step 100k shunt network starting with the 100 Ohm resistor. This brings the maximum attenuation level to 60dB which is quite sufficient in my case, at that level I can’t hear much. The last 23d step of the attenuator I have left open (no resistor across) so that at the max level I have no attenuation at all. This is useful if you plan to hook a preamp in front of the amplifier at some point. If you are planning to use the attenuator in a preamp you don’t need to leave the 23rd step open. I hope this helps.
Best Regards,
Dimitar
Thanks Dimitar,
So start at the 100r resistor and finish at the 34k so 12db attenuation?
Thanks
Chris
Yes, that’s right.
You are welcome,
Dimitar